Wednesday 22 May 2013


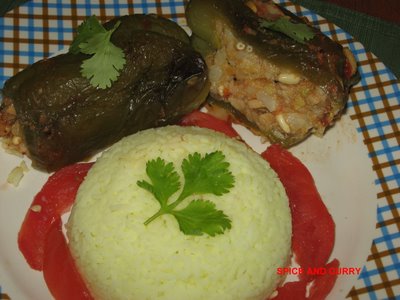
Bharwan Shimla Mirch (Stuffed Bell Peppers)



Capsicum /Shimla Mirch(Capsicum annum) belongs to Solanaceae family(Eggplant/tomato family or Night -shade family) , commonly known as bell peppers , they are used in salads , stir/fry , salsas , stews, soups and curries also .Bell peppers come in so attractive colours red ,orange,yellow are all riped and are sweet in taste more , and green is unriped variety .
They are known to be first grown in South America , and then gain popularity in other parts of world .Rich source of Vitamin C & D, Red peppers contain Lycopene and B –carotene both useful for better eye-sight They also contain Vit B6 and Folic Acid (Red and Orange) useful in reducing the risk of cardio-vascular diseases.
While buying look for the skin to be blemish free ,deep colours and skin intact , they should feel heavy for their size , the stem should be fresh and green .The peak season is July to November , but now , these are available throughout the year, Check your Local grocery stores and Farmers Market for the Organic Variety also .They are paired finely with Tomatoes,Potatoes ,squash ,garlic and onions ..all goes well into curry. They are heavily used in Pizza and Mexican Salsas , like Soffrito etc...
They can be refrigerated easily ,blanching not required , but whole and intact bell peppers freezes well , as there is not much air that is able to go inside it.. here is the recipe for baked Shimla Mirch or Bharwan Shimla Mirch .
Recipe Requirements
~2 large green bell pepper
~3-4 cloves garlic chopped
~1 inch ginger chopped
~1 Onion
~some cashews/pine nuts
~some raisins
~1 tbs of red pepper powder
~½ tbs corriander powder
~½ tbs cumin powder
~ 1tbs of Mc Cormick garlic pepper seasoning (California style)
~2 Large Boiled potatoes

Method
~Heat oil and fry the onions/garlic/ginger for some 5 mints at low , add the dry seasoning .
~Add the tomatoes and fry for some more times , when the oil seems to come out of the sides , stop it cooking .
~Mash the potatoes with spoon while hot and add the prepared masala to the mashed potatoes ,add salt as per taste ..add cashews and raisins.
~Preheat the oven at 350 F( 175 deg C )
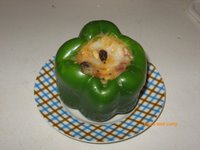
~Meanwhile cut an incision at the top and cut the cap and stem take out the seeds with spoon or better feel free to use your hands and stuff the potato mixture to the bell pepper with a spoon .
~Now in a cassorole dish , spread tomato sauce (can use jarred pasta sauce also), place the stuffed bell pepper over it and bake it for 50 mints flipping the side in between ,cook till a brown crust develops over the bell pepper .
~At the final 5 mints sprinkle some shredded cheese ( I use cheddar cheese, can use Mozzerella also) and bake it for just 2 mints till it melts..
~Take out and serve with roti or rice of your preference.

~Bharwan shimla mirch can also be prepared by frying in oil , heat a kadai/saucepan , add oil and gently set the peppers inside , cover and low the flame , approx 7-10 mints and then again change the sides of pepper , cover and cook for approx 7 mints . When you can see its roasted or a brown crust develops take it out and serve .Enjoy with Roti/Chawaal/Bhaat or as is ...

We can not do all great things , but we can do small things with great love.-Mother Teresa
Have you really pondered for some moments that we are much blessed by God for providing a shelter home , food to eat and money to spend .There are millions of those underpriveledged who don’t have anything to eat or live life on streets , No luxary to afford , Children living their life on begging and collecting garbage from road sides with no hope for a better Tommorrow ..If your heart melts for them then participate in bringing the goals set by Gracious VKN. For more details go To Vcc-q4-2006-you-can-cook-for-fahc and Fahc-campaign .
Some more recipes next time , Bon Apettite and Happy Cooking

Cold Strawberry Soda on a Hot Summer Day

Michele and I are still mid-remodel, so this easy, breezy, strawberry syrup recipe was a welcomed addition to the video schedule. I have my friend Jen Yu from Use Real Butter to thank for that, since it was her gorgeous post that inspired this answer to all those “summer drink” food wishes I’ve been receiving lately.


Jen publishes one of the best blogs around, and if you want to see how this beautiful beverage should really be photographed, check out her original post. Jen's fine food blogging prowess is only eclipsed by her photography skills. Speaking of which, don’t miss her photos of the recent eclipse!


I can’t think of many summer drinks this wouldn’t be great in, but for me it doesn’t get any better than a simple strawberry soda. Give me a big icy pitcher of this blush brew, an Adirondack chair, a little SPF 100 for my bald spot, and I’m ready to happily take on any heat wave. Of course this is only going to be as great as the strawberries you use, so bide your time until you come across those perfect pints.


By the way, the long-lasting aroma that will envelop your home is so enticing, so heady that the syrup almost seems like an added bonus. Michele walked in just as the berries had finished simmering, and couldn’t believe how wonderful the flat smelled. I hope you give this a try soon. Enjoy!


Strawberry Syrup (makes about 1 quart)

Original recipe from Marisa McClellan’s highly regarded Food in Jars.


2 lbs very ripe strawberries, hulled and sliced
3 cups cold water
2 cups white granulated sugar

Affogato and the Magic of Cold Brewed Coffee


Michele and I are still in steamy Chicago, where the temperature is about 95, but the humidity makes it feel more like the sun. Man, could I go for an iced coffee right about now. I’ve been interested in trying this cold-brewed coffee technique for a while, but it was this lovely post on An Edible Mosaic that moved me into action.


Of course, the glamor shot (formally referred to as the “money shot”) is of an Affogato – the ultra-simple, Italian coffee dessert – but the real star here is the amazingly easy iced coffee concentrate recipe.


Apparently, since the flavors are extracted without heat, the results are a smoother, less acidic, less bitter product, which supposedly offers a purer coffee experience. All I know is that it made the best tasting iced coffee I’ve ever had. This would’ve been a complete success just for that fact alone, but that it also made possible this incredibly refreshing affogato, puts it way over the top.


You can use the coffee concentrate straight on ice cream or gelato, or dilute it with an equal part water for iced coffee. Of course, the purists will tell you that affogato is made with hot espresso, but the cold coffee works really well. The ice cream melted more slowly, and seemed to be even creamier than the standard technique.


Anyway, this only takes about five minutes to make, there are no special tools or equipment needed, and one taste is all you’ll need to become a believer like me. I hope you give this a try soon…while it’s still hot. Enjoy!


Cold-Brewed Coffee Concentrate (makes about 2 3/4 cups)

3 cups cold water

2/3 cup very freshly ground coffee (I used the medium grind on my espresso machine)

*Mix water and coffee in a large glass container. Cover and let it sit at room temperature for 12 hours. Strain though coffee filter or paper towel, and serve!


For the Affogato:

1 or 2 scoops vanilla ice cream or gelato

as much coffee concentrate as you like (I like equal parts)

shaved dark chocolate

“Red Hot” Liqueur – Nicer AND Quicker

There’s an old Valentine’s Day saying that goes, “Candy is nicer, but liquor is quicker.” It’s really a lovely sentiment, but implies you have to choose one or the other. Hopefully this beautiful and delicious homemade cinnamon liqueur will prove that you can use both.

This is dead simple to make, and I was pleasantly surprised at how delicious it came out. As I mention in the video, the candy’s spicy cinnamon flavor and sweetness really mellows the burn of drinking straight 80-proof booze. This makes for some very smooth sipping, but at the same time demands at least a modicum of restraint.

I enjoyed mine neat, but imagine this would be great over ice, maybe with a splash of soda. I’m also wondering how it would be in a mug of hot cider, and by wondering, I mean obsessed with finding out. Stay tuned.


I’d like to extend a very special thanks to my friend, and fellow food blogger, Sean Timberlake. Sean publishes Hedonia and Punk Domestics, and he’s the one who turned me on to this brilliant elixir. His only request was that I use the knowledge for good, and not evil. Sorry, too late!

Anyway, giving edible gifts like chocolate is very traditional on Valentine’s Day, so why not a drinkable gift? And if you do decide to bottle some up, don’t forget your own customized warning label, as it will really show how much you care. I hope you and your Valentine give this a try soon. Enjoy!


Makes about 2 1/2 cups of “Red Hot” Liqueur 

1 cup Red Hots candy
2 cups cheap vodkahttp://tastydishies.blogspot.in/

Pan-Roasted Marble Potatoes – A Short Post About Little Potatoes from a Small Town

You’ll have to excuse the smaller than usual blog post, but I just flew across country, and boy are my arms tired…sorry, not arms, I meant jokes. 

Anyway, I’m back at my mom’s for a few weeks to help her out after some shoulder surgery, and despite a very late, turbulent, and sleepless flight, I had just enough energy left to post this marble potatoes video.


I generally try to stick with ingredients that can be found at any large grocery store, and I hope that’s the case here, but to be honest I really didn’t care, as these were just too damn cute not to film. If at all possible, I hope you give this a try soon. Enjoy!


Ingredients:

4 stripes bacon, sliced

1 pound marble potatoes

salt and pepper to taste

2 tsp chopped rosemary

1 tbsp rice vinegar, or any vinegar

Smoked Turkey & Spring Pea Fettuccine – A Pasta From My Salad Days

This rich and creamy, smoked turkey and spring pea fettuccine recipe is inspired by a pasta I learned long ago, working at my first real chef job in San Francisco. 

You may have heard me mention Ryan’s Café in the past, especially if you’ve tried our famous chicken Marsala, and it was at this same restaurant where I learned what I still consider one of the best pasta recipes ever.


As I mention in the video, the original was done with smoked chicken, but for whatever reason smoked turkey is much easier to find at the market. I blame the sandwich industry, but no worries, as the turkey is just as good. There’s just something very special about the way the creamy, slightly sweet, aromatic sauce pairs with the smoky meat. Which reminds me, this is also wonderful with leftover ham.


Regarding what many would consider the dangerously large quantities of cream, I’d like to take a moment to do some math. The recipe makes four appetizer size portions. There’s about 1 3/4 cups of cream used, which is roughly 350 calories worth of butter-fatty goodness per serving. To put that into perspective, those two small ladles of dressing you used during your last trip to the salad bar had about the same amount. So, long story short, relax.


Anyway, now that I’ve armed you with a comeback for when your (probably too thin) friend questions your copious cream usage, I hope you give this very simple, but extraordinarily delicious pasta recipe a try. Enjoy!


Ingredients for 4 small or 2 large portions:

8 oz dry fettuccine noodles, boiled in salted water

For the sauce:

1 tbsp olive oil

1 tbsp minced garlic

1 tbsp minced shallot

1 3/4 cup heavy cream (about 34-36% fat)

6 oz smoked turkey, sliced

1/2 cup green peas, frozen or fresh shelled

2 tbsp minced fresh tarragon leaves

salt, pepper, cayenne to taste

1 tsp lemon zest

Parmigiano-Reggiano to garnishhttp://tastydishies.blogspot.in/http://tastydishies.blogspot.in/

recipe for rice and roti

Indian Food, Indian Recipes, Indian Recipe blog, Vegetarian Recipes, Curry, Gravy, home recipes, Home Cooks Recipes, South Indian Snacks, Easy Recipes, South Indian Recipes, Indian Sweets, Sweets, Microwave Indian Recipes, Tamil Recipes, Lavi Recipes'

Spicy potato curry,I prepare this dish,whenever iam in short of vegetables and in need of curry with lots of kaaram.If you have tasted the chettinaad dishes...their main spice ingredient would be the pepper...but it will be a hidden spice,dominated spice would be of red chilli's.In same way,I have added pepper powder here. I learn this dish while i am living with my friends in room.Those are the very cherrish moments in my life.


Here is the recipe.................

Potato curry Ingredients: 
Potatoes-2 (peel the skin)
Red onion-1 (medium size) - chopped very finely
Tomatoes-2 - chopped very finely
Tamarind - a small lemon size

Dry Red chilli's-3
Curry leaves-8
Garlic-3

Mustard-1/2 spoon
Fenugreek-5 seeds
Asafoetida powder-1/4 spoon

Butter-2 spoons
Oil - 4tbsp's

Potato Curry List of Powder's:
  • Turmeric Powder-a pinch
  • Chilly Powder-1 tbsp
  • Corriander Powder-2 tbsp's
  • Cumin Powder-1/2 tsp
  • Curry Leaves Powder- 2 tsp's (Optional)
  • Pepper Powder-1/2 tsp
Method for Potato Curry:
In a Thick Bottomed Kadaai / Pan, heat 4tbsp's of oil.

Add mustard. when it crack's add fenugreek seeds, curry leaves, garlic, red chilli's & asafoetida powder. fry them for few seconds till the garlic gets sauteed.

Now add Finely Chopped onions, saute them till they turn translucent. and add finely chopped tomatoes. saute the tomatoes along with onions, till they mix up along. You got to saute for atleast 3-4 minutes, till they mix up.

Now add Salt to taste and all the powder's mentioned in the order. fry them well for 2 minute's, till the oil comes out on the sides.

Now add cubically cut potatoe's and mix them well with the masala's.
Add 1/2  cup of Tamarind water and close the kadaai with its lid. slower the flame. let the potatoe's get half-cooked.

After10 minutes..open the lid, add the butter and close the lid.

After 5 minutes..the potatoes would have cooked. you can check that, by inserting a knife into the potato. if the potatoes are not cooked, cook for another 5-10 minutes and remove from flame.. Now the spicy potato curry is ready.
Now it is ready to serve have a delicious food......

Tuesday 21 May 2013

how to make chicken 65 recipe dry crispy masala curry

Chicken 65 recipes, how to make Chicken 65, Chicken 65 video, Chicken 65recipe,hyderabad chicken 65,Chicken 65 recipe dry,chicken 65 curry,chicken 65 masala,chicken 65 video by vanrehvah,south indian chicken 65,Andhra       chicken65,chicken 65 by sanjeev kapoor,chicken 65 in english,chicken 65 video,chicken 65 preparation.


                                                             Chicken 65 recipe at last!

   Isn't that the reaction of many of you dear readers? I know that you have patinently waited for the recipe of chicken 65.There have been numerous request for chicken 65 recipe and somehow i never got down toblogging it. This is one of the most popular Indian Chicken starter recipe and being able to re-create restaurant style chicken 65 at home,successfully,gives one a high.A facorite appetizer in our home along with chicken Manchurian.

There are numerous theories doing the rounds on the internet on the origins of Chicken 65.Whatever the real story,must thank the creator of this delicious Chicken starter recipe.

I am going on a short summer holiday in a while(an hour to be precise) and will see you all after the first week of june.Hope you are having a good summer break.


Chicken 65 Ingredients:-

  • Boneless chicken - 250 gms/1/4 kg (cut into small bite sized pieces)
  • Oil for deep frying
  • Yogurt - a little less than 1/2 cup (perugu/curd)
  • Salt to taste
  • Turmeric powder - 1/4 tsp
  • Red chili powder - 1/2 tsp
  • Coriander powder - 1/4 tsp
  • For Marinade:
  • Turmeric powder - large pinch
  • Red Chili powder - 1 tsp
  • Black pepper powder - 1/4 tsp
  • Ginger garlic paste - 1 tsp
  • Lemon juice - 1/2 tbsp
  • Salt to taste
  • To coat chicken that has been marinated:
  • Egg - 1
  • Cornflour - 1 1/2 tbsp
  • Rice flour - 1/2 tbsp
  • For Tempering/poppu/tadka:
  • Cooking oil - 1/2 tbsp
  • Curry leaves - 1 sprg
  • Garlic - 2 cloves, minced (optional)
  • Ginger - 1/2", minced
  • Green chilies - 4-5, slit length wise

Method for Chicken 65:-

  1. Marinate bite sized pieces of chicken in the ingredients called for marinade for 1 hour.
  2. In a bowl, mix yogurt, salt to taste, turmeric powder, red chili powder and coriander powder. Keep aside.
  3. After marinating the chicken, add egg, cornflour, salt to taste and rice flour to coat the chicken. Add a tbsp of water if required.
  4. Heat oil for deep frying. Once the oil is hot, add a few chicken pieces into the oil without crowding the vessel and cook on medium flame. Once the chicken is almost cooked, increase flame and deep fry the chicken pieces till golden brown.
  5. Remove onto absorbent paper. Keep aside. Repeat with rest of the chicken pieces.
  6. Heat a cooking vessel, add a tbsp of oil. Add garlic and ginger and saute for a few seconds. Add curry leaves and green chilies. Saute for a few secs. Add the deep fried chicken and toss well and cook for 2 mts.
  7. Add the yogurt mixture and cook on low to medium flame, mixing the contents well. Toss the chicken till the yogurt dries up and the chicken absorbs the yogurt mix.
  8. Remove onto a serving plate. Garnish with coriander leaves.

how to make indian sizzling pepper ginger lemon chicken gravy dry fry curry preparation video by sanjeev kapoor and vahrehva in english and hindi

pepper chicken,pepper chicken recipe,pepper chicken gravy,pepper chicken dry,pepper chicken fry,how to make pepper chicken,how to make pepper chicken gravy,how to make pepper chicken fry,prepare pepper chicken,prepare pepper chicken fry,prepare pepper chicken grave,prepare pepper chicken curry,easy prepare chicken,pepper chicken video by vahrehvah,pepper chicken video by sanjeev kapoor,Indian pepper chicken,sizzling ginger chicken,pepper lemon chicken.

Pepper chicken is one of the easiest chicken recipes I've learnt recently.I've slowly started to cook non vegetarian dishes especially chicken.I got a chicken recipe handbood from a broiler shop long back even before blogging and now I am dishes from it one by one.This pepper chicken is one recipe i tried from there.....should say this is a kepper.


Pepper chicken Ingridents:-

  • Chicken - 400 gms
  • Onion - 1 finely chopped
  • Tomato - 1 finaly chopped
  • Ginger garlic paste - 1 tsp
  • Turmeric powder - a generous pinch
  • Red Chilli powder - 1/2 tsp
  • Coriander powder - 1 tsp
  • Coriander leaves - 1 tsp chopped finely

To Temper pepper chicken:

  • Jeera
  • Cinnamon - 1/4 inch piece
  • Cloves - 2
  • Cardamom - 1
  • Curry leaves - 10
  • Green Chillies - 1 chopped

To grind pepper chicken:-
  • Pepper - 1.5 tsp
  • Fennel seeds - 1/2 tsp


Method for pepper chicken:-

1.Dry roast the ingredients under the list 'to roast and grind' till slightly browned and grind it to a coarse powder(I used my hand motar pestle to do that). Keep aside. In a pressure cooker heat oil - add onion and ginger garlic paste and saute till slightly browned.Pepper Chicken(Dry) - Step12.Then add tomato and fry till its mushy and raw smell leaves. Add the turmeric,red chilli, coriander and half of the coarse pepper powder along with chicken pieces and fry well till raw smell leaves. Saute till chicken is well blended with the spices.Pepper Chicken(Dry) - Step23.Then add water till immersing level say 1 cup along with salt and pressure cook for 4 to 5 whistles.Meanwhile heat oil in a kadai and add the items under 'to temper' then add pressure cooked chicken.
Pepper Chicken(Dry) - Step3
4.Add the remaining pepper fennel powder and saute till it becomes semi dry.Taste and adjust salt.Add chopped coriander leaves and switch it off.
Pepper Chicken(Dry) - Step4

My Notes:-


1) This is a dry curry and suits well with rice or even rotis.


2) Adding freshly ground pepper powder gives a nice flavour but check the spice level before adding it.


You might also like:

indian master chef sanjeev kapoor assorted vegetable pulao pulav rice bowl gravy recipes in 30 minutes or less time to make main ingredient asian breakfast lunch sanacks pasta

Assorted Vegetable Rice, Vegetable Rice Assorted, Rice recipes, Master Chef Sanjeev Kapoor, Colourful Rice, vegetable pulao pulav-rice with assorted vegetables,vegatbales, rice bowl, gravy,30_minutes_or_less,time_to_make,course,main_ingredient,cuisine,preparation,for_1_or_2,breakfast,lunch,snacks,rice,asian,pasta_rice_and_grains,number_of_servings
This is the very easy to make for every one i takes preparation time for  10 minutes and it takes cook time 10 minutes and it is pure vegitarian we are all  using the vegetables in the rice.


 Preparation Time: 10-15 minutes
 Category: Veg


Rice,soaked and boiled1 cup
French beans,finely chopped5-6
Carrots,finely chopped2 medium
Button mushrooms,diced6-7
Babycorns,finely chopped5-6
Brinjal,cut into cubes and deep fried.1 long
Garlic,chopped1 tablespoon
Oil2 tablespoons
Soy sauce1 teaspoon
Saltto taste
Five spice powder1 tablespoon
Spring onion greens,finely chopped1 stalk


Method

We have to take the non-stick pan and poured the oil. Heat oil in a  non-stick pan. Add the garlic and sauté for two minutes.Add the beans and carrots, mix well and saute for three to four minutes. Add the mushrooms and baby corns, mix well and cook till dry.

Add the brinjals and cook till all the vegetables are done. Add the boiled rice, five-spice powder, soy sauce and salt and mix well. Serve hot garnished with spring onion greens. 

how to make perfect sponge and baking traditional british feather light cooking tips for cakes

Traditional British Cakes - Feather Light Sponge Cake - Tips to Make a Feather Light Sponge Cake,how to make a cake, cake making, baking cakes, how to make birthday cake, time to bake a cake, filling a cake,cake, cooking tip, sponge, rolls, roll, cake roll, sponges.

how to make sponge cake
sponge cake recipe.This light and airy recipe for sponge cake serves as the basis for many types of layered cake desserts like angel food cake.Enjoy our sponge cake recipe.


Prep:
10m
Cook:
1h:40m
Total:
1h:50m
Serves:
6 to 8
Temp:
180° c  -  360° f


Sponge Cake Ingredients:-

  • 8 eggs, separated to whites and yolks
  • 190 g sugar
  • 95 g flour
  • 55 g corn starch
  • 45 g butter, melted
  • 1 tsp vanilla extract
  • 1 mixer with whisk attachment
  • 1 rubber spatula
  • 1 spring-formed pan, 26cm diameter, lined with parchment
  • 1 bowl
  • 1 sieve
  • 1 wooden skewer

  • How to make Sponge Cake Video:-


Method for Sponge Cake:-

Step 1: You will need

See top right.

Step 2: Preheat the oven

The first thing that you need to do in preparing your sponge cake is to set your oven to 180°C, 350°F or gas mark 4.

Step 3: Mix the egg yolks

Place the egg yolks into the mixer and mix them on a high speed until creamy. After a minute, add about 2 tbsp of sugar. Continue to mix for a few minutes more until the mixture becomes thicker.

You can now add the vanilla extract. Keep mixing until the mixture becomes double that of its original volume. Now turn off the machine and transfer the egg yolks to a separate bowl.

Wash your mixing bowl and the attachment well in preparation for whipping the egg whites.

Step 4: TIP!

Make sure that the mixer attachment and bowl are washed extremely clean at this point. If not, any fat that remains on these utensils will affect the whipping of the egg whites. Make sure your things are spotless!

Step 5: Whip the egg whites

Place whites into the clean mixer bowl. Beat them on high and let them whip until they become white and frothy. Now slowly add the sugar a bit at a time. The whipped egg whites mixture is ready when it clings to the beater attachment but does not drip. Once the mixture is nice and stiff, turn off the mixer.

Step 6: Combine yolks and whites

Now you can introduce the egg yolks to the egg whites mixture. Add the whipped egg yolks into the egg whites and fold them in with the rubber spatula. Make sure not to over-mix.

Step 7: Complete the batter

Next, we need to introduce the flour and corn starch to the eggs. Start by combining the flour and the corn starch in the sieve and using your hands, slowly sift it into the mixture. Sifting the flour will increase the amount of air in the cake, helping to make it even lighter.

Fold it all together remembering again not to over-mix and then add the melted butter to the batter, combining it in briefly.

Step 8: Bake

Using your rubber spatula, you can now transfer the batter into the lined spring-form pan. Spread the batter evenly with the rubber spatula and give the pan a few good shakes to remove any air pockets that might remain.

Now put the cake into the oven and allow it to bake.

Step 9: Remove the cake

After around 30 minutes, test the cake to see it is ready. Insert a wooden skewer into the centre of the cake. The cake is ready when the skewer comes out free of batter. Now set it aside to cool before removing it from the pan.

Once the cake is totally cooled, take a sharp knife and run it around the outside of the cake. Now remove the spring-form pan and there you have it, your sponge cake.

Step 10: Serving Suggestions

Although sponge cake can be eaten as it is, it can be used as the base for many different layered cakes. We hope you enjoy your sponge cake